Creating a rendered entity and adding it to the view.
This section describes how to create a rendered entity and add it to the view.
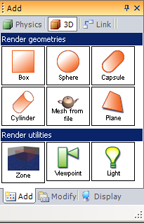
Adding a rendered entity to a view:
|
Action |
Description |
|
 |
|
 |
|
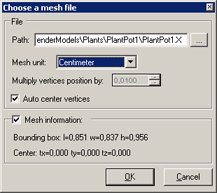
Special dialog box: If you choose an entity that requires a file, like a mesh, a dialog box will prompt you to choose the file path and how the file is managed: Path: file full path, Mesh unit: indicates the coordinates multiplier in order to scale the input mesh. Auto center vertices: if checked, the option auto center mesh coordinates around (0,0,0), Mesh information: allow/disallow mesh information display. This display can take several seconds according to the mesh complexity. Bounding box: mesh's bounding box size, around its center. Center: indicates the current mesh translation. it should be 0,0,0 if Auto center vertices is checked |
 |
|
Documentation v4.7 (18/01/2015), Copyright (c) 2015 anyKode. All rights reserved.
|
|
What do you think about this topic? Send feedback!
|


 Description