There are several ways to create rigid bodies in Marilou:
Method 1: Automatic creation
- Select the entities that you would like to assemble.
- Click on Auto Rigid Body:
A dialog box asks you whether you want to create one rigid body per entity, or one single body that assembles all the selected geometries.
For example:
- A bag of marbles: select all the marbles -> Auto Rigid Body -> 1 body per marble
- A table: select the legs and the table-top -> Auto Rigid Body -> 1 body contains all entities
Method 2: Create a Rigid Body entity and then add physical entities:
|
Actions |
Description |
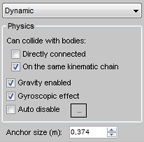
Create a RigidBody entity:
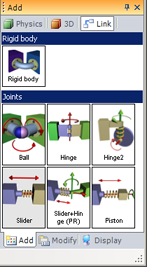
- In the Add panel, go into the Link tab.
- Click on Rigid body to activate creation mode.
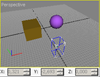
- Move the mouse cursor over the perspective view (the cursor becomes red to indicate that creation mode is active).
- Left-click with your mouse in the perspective view to start creating a solid body.
- Holding the mouse button down, move your mouse to set the body's size, then let go of the button (the body's size is purely visual and has no effect on simulation).
|
|
|
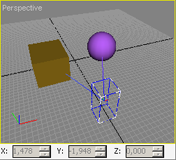
At this point the rigid body is placed on the ground and does not contain any geometries:
Switch to selection mode to continue. |
|
- Select the rigid body and display its properties.
- Click on the plus sign ("+") to add the geometries that will make up the rigid body.
|
|
- A segment between the rigid body and the geometry shows the connection.
|
|
|
The two geometries now form a single rigid (non-deformable) body, and have therefore become dynamic. |
|
Method 3: Create a Rigid Body and an automatic connection
- Create a rigid body entity as instructed in Method 2.
- Switch to selection mode.
- Make sure that no entities are currently selected (for example by clicking in an empty zone on the display).
- Select the rigid body and then select the entities that need to be assembled (it is important to select the rigid body first)
- Click on Link entities (or press Ctrl+L):
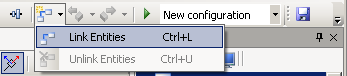
This action automatically adds the entities to the rigid body.


 Description