Using emitter/receiver.
An emitter/receiver device is attached to a zone entity (see creating zones).
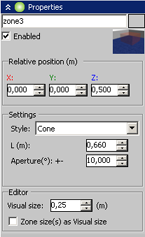
The emitter sends its signal in the direction of, and with the same "shape" as its parent zone. For example, infra-red emission typically uses a cone-type zone (emission bounded by a cone), and RF (radio frequency) emission is usually a sphere-shaped zone (omni-directional).
A receiver can accept messages that arrive in its zone. In this case, only the zone's shape matters, not the size of the zone.
Reception is only possible if the emission range, in the direction of the receiver, is greater than or equal to the distance between the emitter and the receiver (with respect to the center of the parent zone).
If this is the case, zones still need to be compatible in order to exchange messages, that is the segment S which passes through the center of both zones:
|
Emitter zone /Receiver zone |
Compatibility |
|
Sphere / Sphere  |
Emission in all directions and reception in all directions: S simply has to reach the center of the receiver zone for transmission to succeed. |
|
Sphere / Cone |
Reception possible if S passes through the receiver cone without touching its edges. |
|
Sphere / Box |
Same operation as Sphere / Sphere |
|
Cone / Sphere |
Reception possible if S passes through the emitter's cone without touching its edges. |
|
Cone / Cone |
Reception possible if S passes through the interior of both cones without touching the edges. |
|
Cone / Box |
Same operation as Cone / Sphere |
|
Box / Sphere |
(under development) |
|
Box / Cone |
(under development) |
|
Box / Box |
Same operation as Box / Sphere |
Filters and standards (communication media) are applied to devices. This includes wireless support (802.11, serial, etc.) and support for light waves (i.e. infrared) and sound waves. The various media and standards depend on device configuration.
|
Step |
Description |
|
|
|
|
Create the zone(s) that will contain the emitter/receiver: In the screen shot on the right, we have attached these zones to physical boxes in order to be able to move them around while simulation is running (you may not select zones during simulation). These are 3-D objects that can be attached to any physical object. You will find zones on the Add > 3D tab |
|
|
Configuring the zone's shape
|
 |
|
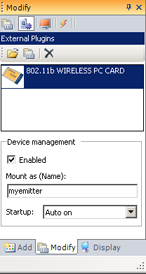
Attaching an emitter/receiver device:
|
 |
|
In MODA programming, emitters/receivers are accessible via the DeviceEmitterReceiver class. The device's full path in this example, starting at PHX "/" is zone3/myemitter. |
|
As zone is considered as a rendered entity, it is therefore possible to attach it to a physical entity so that it follows the movement of the entity (see Attaching to a physical entity).
A given zone may contain several emitters/receivers.
|
Documentation v4.7 (18/01/2015), Copyright (c) 2015 anyKode. All rights reserved.
|
|
What do you think about this topic? Send feedback!
|


 Description